





Experimentation has long been an essential part of (online) marketing. Methods such as A/B testing allow us to quickly and reliably determine which version of content resonates best with readers or users. This can also be applied to your mobile app. A/B testing is a core part of App Store Optimization. In this tutorial, we'll walk you through, step by step, how to arrive at the optimal listing for the App Stores. Ready, set? Test!
Why are A/B tests important for App Store Optimization?
Okay, first things first. When we talk about App Store Optimization, we're looking for ways to make an app more visible across the various app stores. We previously covered the basics of App Store Optimization. Factors such as titles, descriptions, and previews (the screenshots shown in the App Stores) all influence ranking. But how do you actually know whether the optimal version of your App Store listing is live?
With A/B testing, you can improve your app listing by showing different content, features, and designs to your target audience. You then measure whether these versions actually impact key metrics such as conversion rate, revenue, and so on.
What can you A/B test in the App Stores?
In this example, we'll look at the two largest app stores: the Google Play Store and the Apple App Store. What you can test differs per platform.
Apple App Store
Let's start with the Apple App Store. All your app's data lives in App Store Connect. From the "App Store Optimization" page, you can create tests for the following elements:
- App Icon
- App Store Previews (the screenshots shown in the App Store)
Now, I can hear you thinking: that's it? Yep. At the moment, that's all you can test. As humans, we're highly visual, so these two elements still carry a lot of weight.
Google Play Store
All your Android app's data lives in Google Play Console. Under the "Store Listing Experiments" tab, you can manage all your A/B tests. Within the Play Store, you can test the following elements:
- Short description
- Full description
- App icon
- Feature graphic
- Screenshots
- Video
With Google, you have quite a few more options to test, including text. That's a major advantage, because text means indexing, and indexing means ranking. In other words, with Google's Store Listing Experiments, you can test which copy resonates best with your target audience.
Creating an A/B Test in the App Stores
App Store Connect
Step 1: Log in to App Store Connect and click on App Store Optimization (under Features)
Step 3: Click the + icon to create a new A/B test
Step 4: Choose the name and variables for your test.
Reference name: We always use the same format:
AB test [Version] [Element] [Country]. Example: AB test V1.0 AppIcon The Netherlands
Number of Treatments: the number of different versions you have. Maximum is 3.
Traffic Proportion: What percentage of all visitors will see this A/B test? For the fastest results, choose the highest percentage.
Localizations: Does your app have multiple languages available? Choose which country will see this A/B test (you can also select all of them).
Once you've filled in these variables, App Store Connect immediately gives you an estimated test duration. Here you can optionally select the required percentage difference. For 99% of tests, you can leave this as is.
Step 5: Upload or select your new assets for the treatments.
Running an A/B test with different App Store Previews? You can upload these directly in Connect. Make sure to upload them in all the correct formats. The required dimensions can also be found on Apple's site. Note: want to run a test with different app icons? You'll first need to add these to the Assets folder in Xcode. Click here for the extensive documentation.
Step 6: Start the experiment. Time to go live! 🙂
Yes. Your A/B test now goes to Apple for review. Testing different app icons? Then your test will actually already have started, since you'll already have gone through review once when adding the app icons.
Step 7: Now it's time to wait. You can view your first results directly in your app's Analytics. Noticing anything yet? We recommend running the test for at least 14 days. You won't see meaningful differences until hundreds of visitors have seen each treatment, so be patient.
Google Play Connect
Step 1: An A/B test within Google Play Connect works in a similar way. Log in and go to "Store Listing Experiments"
Step 2: Choose the name, store listing, and experiment type
Custom store listing name: we always use the same format:
AB test [Version] [Element] [Country]. Example: AB test V1.0 AppIcon The Netherlands
Store listing: choose your primary store listing here
Experiment type: This depends on which element you want to test. Standard experiment applies to your Dutch listing. If you'd rather test per country, you can choose a localized experiment instead.
Step 3: Choose the recommended target metric.
Step 4: Choose your variants (how many variations you want to test, up to 3)
Step 5: Experiment audience, minimum detectable effect, and confidence level
For 99% of all A/B tests, these can be left at their default settings.
Step 6: Variant configuration
Now we get started. In the Google Play Store, you can test much more than in the App Store. Choose the attributes you want to test against your current store listing. For the best results, select one item at a time. Under variants, you can add your assets.
Step 7: Start the experiment. Time to go live! 🙂
Yes. Your A/B test now goes to Google for review. This takes a few days. Once the experiment is approved, the A/B test goes live right away.
Step 8: Now it's time to wait. You can view your first results directly in your app's Analytics. Noticing anything yet? We recommend running the test for at least 14 days. You won't see meaningful differences until hundreds of visitors have seen each treatment, so be patient.
Analyzing A/B Test Results
Data analysis is the important step when running experiments. Here it's essential to stay focused on the primary goal of your experiment. What do you want to achieve: more downloads? Higher retention? You can find this out by digging into the data. Let's walk you through an example.
Case: BabyManager Play Store A/B Test
BabyManager is an app for expecting and new parents. Every user gets three months of BabyManager covered by their health insurer. The app has many features, such as 24/7 chat with maternity care professionals, a personal photo book, and in app courses. During the A/B test (initially Android only), we focused on the app's two most important features: chat and the photo book. Primary goal: more downloads. These were the results after a few weeks:
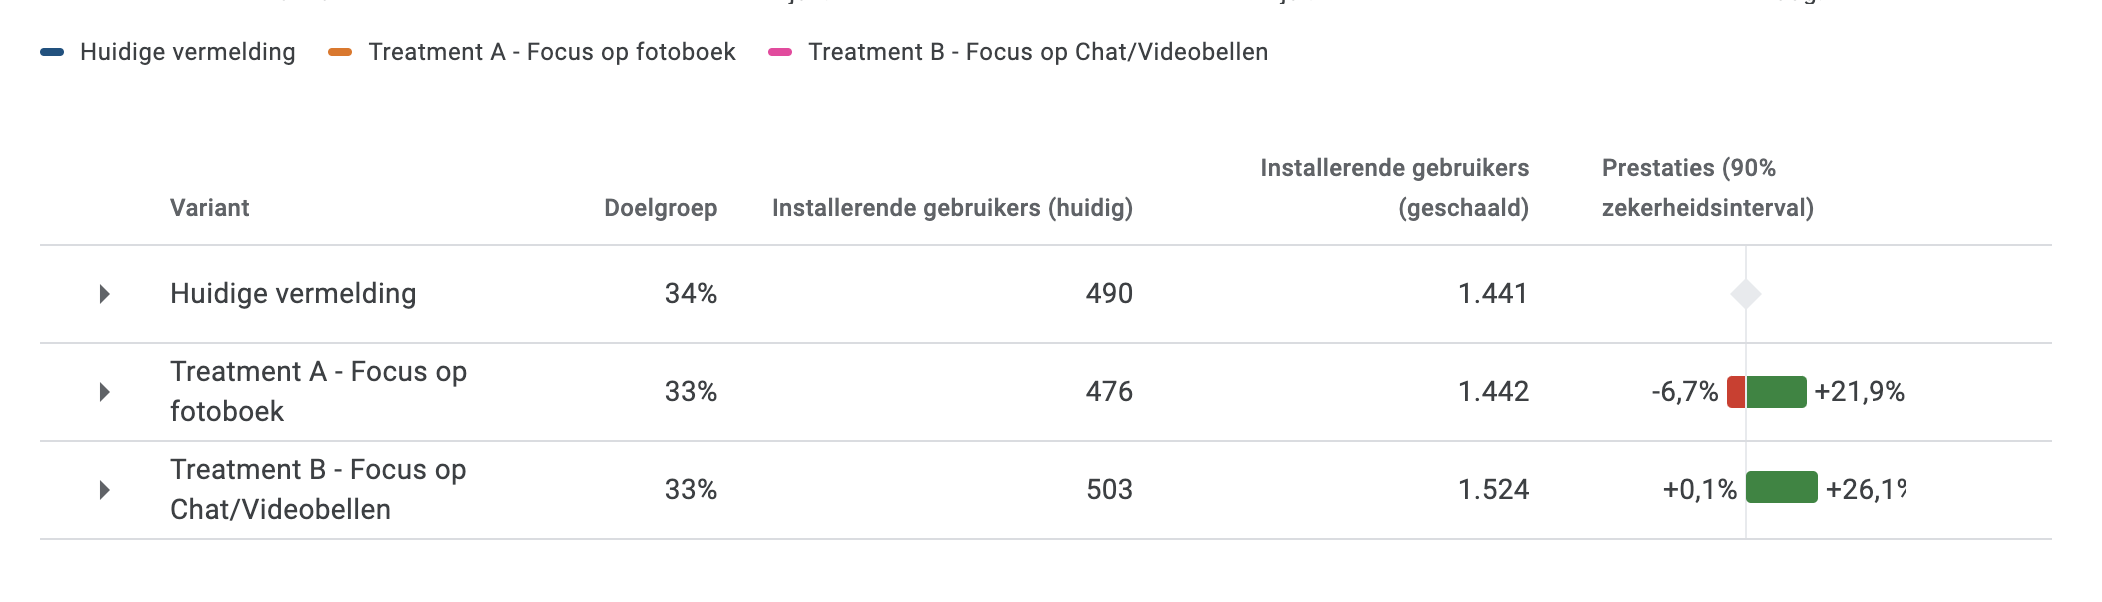
In this A/B test, we adjusted the first screen of the App Store Assets (the app's images) so that it highlighted both USPs. As you can see, roughly equal numbers of installing users saw each variant. However, we can immediately spot differences. The focus was on new installing users, since the app had recently launched. This test shows that both new screens outperform the current listing. But which version of the Treatments (variables) actually won? You can determine that by looking at the confidence interval. For Treatment A, focus on photo book, there's a margin of uncertainty of -6.7% in the results. This means there's also a possibility that Treatment A actually performs worse than the current listing. For Treatment B, there's no such uncertainty.
You could choose to implement Treatment B as the new current listing right away. An additional validation step would be to set up a new A/B test with a single treatment, namely "Focus on Chat/Video Calling." This way, you can always be sure the data is valid. Within App Store Connect, the process works almost the same way. The only difference is that you'll see Conversion Rate (percentage of views/downloads) instead of installing users.
Want to grow (organically)? Let us help
As you can see, there's a lot involved in running an effective A/B test. Our certified App Marketing specialists are happy to advise you on optimizing your App Store listing. Book a consultation directly or feel free to stop by our office in Utrecht.


